

For years and years the recommended method – for me at least – of learning and playing around with the latest Dataverse, Power Platform, and D365 features is to sign up for a free trial. To the point that for the last 10+ years I’ve always just assumed it was common knowledge. And in some circles, it is.
Yet, I keep coming across people who either don’t know about signing up for a trial, or – and this is the part they have trouble expressing – they don’t know how to do it the right way. That’s the part that people get stuck on, because there’s actually a secret sauce for getting yourself a useful environment on-demand for learning and experimentation. They try to sign up and run into roadblocks – Like a message saying their email is already in use, or that they don’t have permissions to add a trial to their tenant.
Now – I’m not sure if Microsoft really wants people to know this – BUT since not many people are likely to even see this blog post unless I direct them to it, hopefully I don’t ruffle any features.

All right, here’s a quick guide on how to sign up for a Dynamics 365 trial. I always like to start by creating a new Chrome profile. You don’t have to use Chrome; you can use any browser you prefer, but I just happen to use Chrome. It’s something I’m used to, even though there are probably better browsers out there. You could do basically the same thing with any other browser.
Step 1: Create a New Browser Profile
- Open Chrome and create a new profile.
- I usually name mine something straightforward like “New Trial D365.”
Why create a new profile? Well, it keeps everything clean and separate, especially if you’re juggling multiple tenants or environments.
Step 2: Search for Dynamics 365 Trial
Now, why might you even want a Dynamics 365 trial?
There’s plenty you can do with just Dataverse or Power Platform trials, but I prefer going all the way with a Dynamics 365 trial (either customer service or sales). It lets me dive into the specific functional capabilities and stay updated with the latest business application features. Plus, getting a Dynamics 365 trial will automatically give you access to Dataverse, but not the other way around.
Also, just a quick note: this guide isn’t for adding a Dynamics 365 trial to an existing tenant. This is specifically for a totally independent tenant, not connected to your work account or anything else. That’s important because a lot of people get confused, trying to add a trial to an existing environment, and that’s a whole other can of worms.
Step 3: Starting the Trial Signup
- Search Google for “Dynamics 365 Customer Service Trial.”
- Click on the first result, which should be the official Microsoft Dynamics 365 trial page https://www.microsoft.com/en-us/dynamics-365/free-trial

Click on the option you want: I recommend Sales or Customer Service
When you land on the trial page, you’re going to see a tempting email box right at the front asking you to enter your email to start your free trial.


WAIT!!!! This isn’t what you want – if you enter your email there, it’ll assume you’re trying to add the trial to your existing tenant (or your work/school tenant) and that almost always leads to trouble.
Instead, look for the tiny fine print below that box. It’ll say something like:
“You can sign up with education or personal email address. Alternatively, click here to create a new Azure Active Directory account for your trial.”
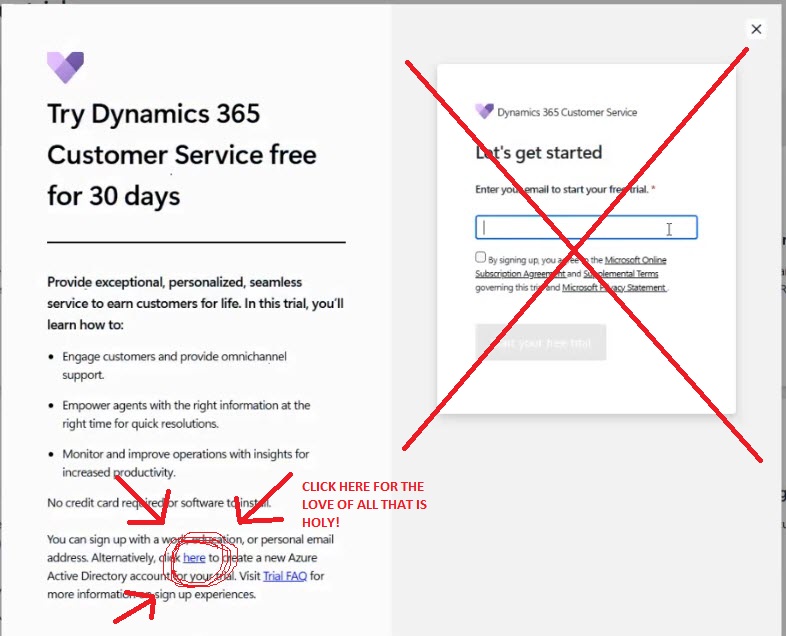
That’s exactly what you want so click there.
Step 4: Creating a New Azure AD Account
This step lets you set up a totally fresh tenant.
- Enter an email that you’re comfortable using to start the trial process.
- You’ll probably have to complete a CAPTCHA to confirm you’re not a robot – don’t be surprised by that.

Now, here’s another potential stumbling block: After entering your email, Microsoft might say something like, “Looks like you’re already using [your domain] with another Microsoft service.”
You might think you want to “Sign in,” but you don’t. You need to click on “Create a new account.” That’s critical. I can’t tell you how many times I’ve seen people get tripped up here.

Step 5: Providing Business Information and Setting Password
- You’ll enter some basic business info and set your domain name. I recommend picking something easy to remember.
- You’ll also set a strong password here. Make sure you save this!
Since you’ve created a new Chrome profile, feel free to save the password directly into Chrome. That makes signing in later a breeze.

Step 6: Payment Method (Don’t Panic!)
Here’s the slightly annoying part: they now ask for a payment method upfront. Microsoft didn’t used to require this initially, but now they do. Don’t panic though; I’ve never actually been charged. They won’t charge you during the trial.
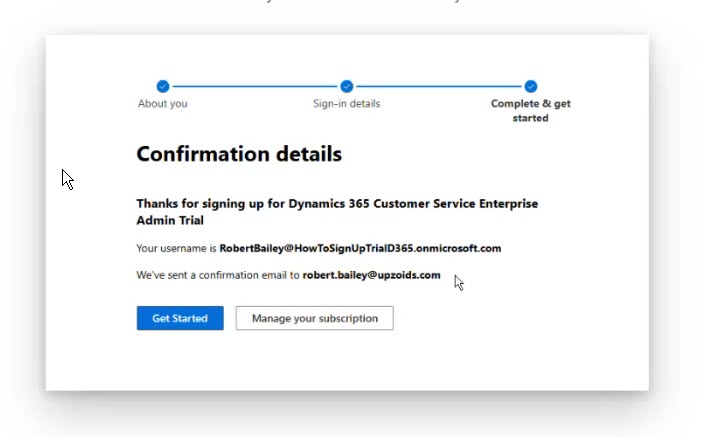
Step 7: Confirmation and Environment Setup
Once you submit your payment details, you’ll get a confirmation page:
- You’ll see your username (it’s an @onmicrosoft.com email).
- Save this username somewhere safe, although you’ve got your password saved in the browser already.
- Click on “Get Started.”
Clicking this used to automatically create your Dynamics 365 environment, but now it only sets up the tenant. So, when you click “Get Started,” you’ll end up in the Power Platform Admin Center, but the Dynamics environment itself isn’t set up yet.
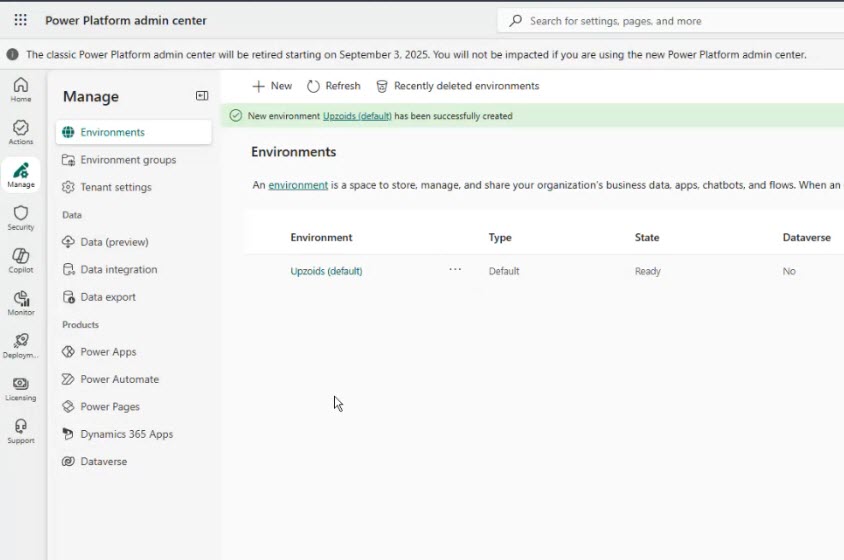
Step 8: Manually Creating Your Dynamics 365 Environment
Since the Dynamics environment isn’t automatically created:
- Click “New” to set up a new environment.
- Select “Trial” subscription type.
- Choose “None” for the security group and select “Yes” for enabling Dynamics 365 apps.

Choose all enterprise applications relevant to your trial (e.g., Customer Service).
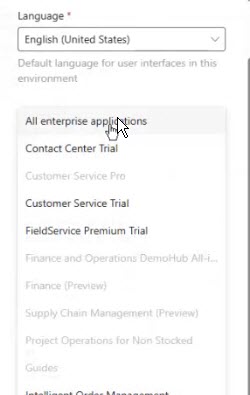
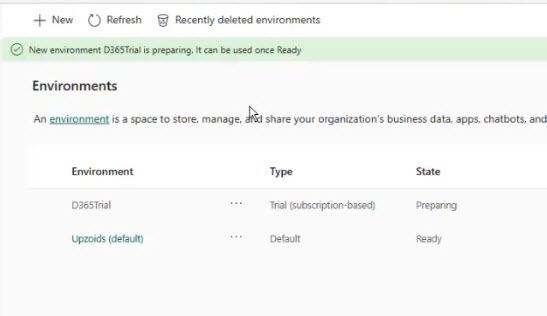
Now, your Dynamics 365 environment will start provisioning. It might take a few minutes.
Final Thoughts
That’s basically it. This approach gives you a fully independent Dynamics 365 tenant, perfect for learning, experimenting, or demoing.
A few tips:
- You usually can’t use a personal email like Gmail or Hotmail; it generally has to be a work or school email.
- That said, you can re-use the same email to sign up each time, as long as you choose to create a new onmicrosoft.com account – that’s the key
If you run into trouble or have questions, feel free to reach out or drop a comment below.
Thanks Everyone for Reading!

One thought on “Signing Up for a Dynamics 365 Trial: The Real Way”