

Hi there and Happy New Year! Welcome back to my security series. I promise that it will get interesting soon, but I want this series to be 100% comprehensive and cover EVERYTHING so the first few entries are going to be boring and cover things you probably already know but there will be a few “Eureka” moments up ahead I promise. Lest time we covered adding users to an environment and assigning them roles. No one needed that, but it’s there as part of the series. This time we will get into User-scoped permissions. Still basic, but another step in the journey.
Security Series Table of Contents
What if you don’t want your CSRs seeing every case? What if you want them to only see cases assigned to them?
There are a few scenarios worth thinking about here. One is that new cases come in, they go into a queue, they get triaged, and then once they’re assigned out to departments or teams, the people doing the triage no longer see those cases. We can come back to that later – there are a few ways to do it.
But let’s keep this simple for now. Imagine a fairly junior role. They’re the people who actually work the cases (think of them almost like work orders) but they’re not the ones deciding who gets what. They only start working once the case is assigned to them. There are tons of real-world scenarios where that applies, so let’s roll with that.
What we need is a security role with user-scoped access to the case table.
Step 1: Do Any Default Roles Fit?
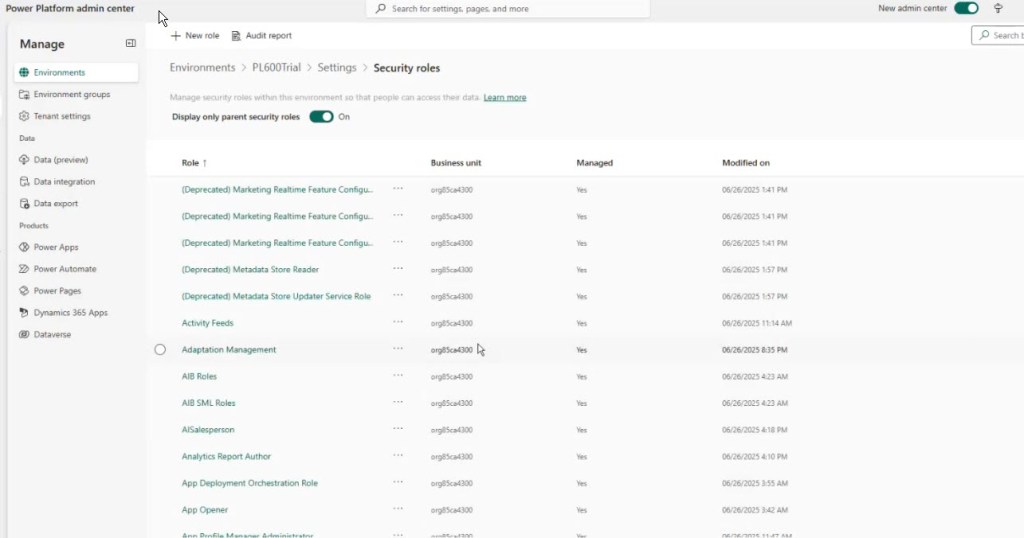
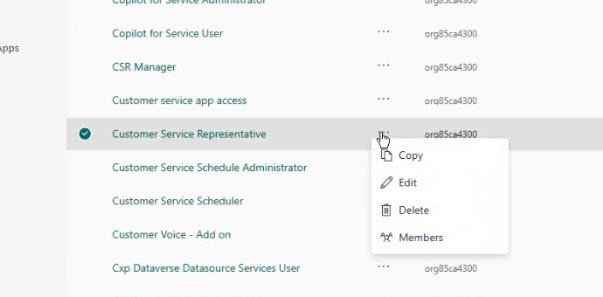
First, check if an out-of-the-box security role fits your “user-level” need. Really, you’ll want to consult documentation. In this case, we could just investigate the good old fashioned way and scan through all the roles and look at the ones that MIGHT do what we want. Go to Users + permissions, then Security roles. This shows you all 10,000 security roles in the system.
And… wow. There are a lot of them. Like, an overwhelming number. These are just the roles that come with Customer Service Enterprise. Ten thousand might not even be enough. There could be a billion roles in here. (OK maybe not a billion or even 10k but it’s a lot.)
Short answer: No — not cleanly.
There is no out-of-the-box Dynamics 365 role that is equivalent to Customer Service Representative but with user-scoped Case access instead of organization-level access.
Some roles come close, but:
- Most CSR-adjacent roles either retain organization-level Case read/write, or
- Strip out far more functionality than you’d want for a working agent.
Ok, so we need a new role right?
Step 2: Create a new Security Role (“User-Scoped Case Access”)
1.Go to Power Platform Admin Center → Your Environment → Users + Permissions → Security Roles.
2.Click New Role. Name it plainly (e.g., “User-Scoped Case Access”). It asks you to pick a Business Unit (which is weird because I just want to create a role – why does a role care about a business unit? We’ll talk about that another time)

3. There’s also stuff about team assignment behavior. Also later. Leave Include app opener privileges checked. (You almost never want to uncheck that unless this role is only for automation and no human is signing in.)
4. Now it’s time to add permissions to the relevant table. Take a look at the list of tables to choose from…..

Ok. It’s pretty overwhelming. Good lord – that’s a LOT of tables. We know we want to restrict access to cases to a user scope (only access cases that have been assigned) But does our junior CSR need access to anything else??? How the heck are we supposed to know? Well, let’s see what happens if we set the permissions on the Case table only:
Luckily we know we care about cases, so we go find it.
5. In the role editor, find the bucket/category for Service. Find the Case table

By default, you’ll see no privileges set on anything — because this role is brand new.
Assign the following permissions on Case:
- Set the Read privilege to User
- Set the Write privilege to User
- Don’t assign Delete; it’s bad practice for most front-line roles.
- Assign Append, Append To to Organization (let’s not worry about these privileges for now – {in a future post} we’ll look at these privileges)
- Assign – leave it alone for now.
- Be careful with Share; it’s powerful, and if you don’t understand it, just leave it off – I will do a separate post (Link {here}) on the topic
Sidebar:
Permissions in Dataverse are always about:
- Which table?
- What action? (Read, Write, Create, Assign, Append, Share, Delete)
- At what scope? (None, User, Business Unit, Parent: Child BU, Organization)
And record access is always based on ownership (User or Team… or, with recent updates, Business Unit).
Permissions themselves can be a tricky concept. Essentially, they determine WHAT you can do for WHICH table when you get the scope to organization, and the ROWS of the table that the permission applies to when it’s set to something else.
So for a given table, You set the SCOPE of each ACTION (Privilege). For example perhaps you want a user to be able to READ (action) all contacts (Table) in the system (scope) but only EDIT (action) those within their business unit (scope).
Here’s a quick, plain-English rundown of the standard Dataverse table privileges:
- Read – View existing records.
- Create – Create new records.
- Write – Edit existing records.
- Delete – Permanently remove records (almost never needed for front-line users).
- Append – Attach this record to another record (for example, adding a Case to a Contact).
- Append To – Allow other records to be attached to this record.
- Assign – Change record ownership (to another user or team).
- Share – Grant access to a specific record outside normal security boundaries.
Each of these actions can be scoped to:
- None – No access.
- User – Only records the user owns (or their teams own).
- Business Unit
- Parent: Child Business Units
- Organization – All records in the system.
Row-level security in Dataverse is simply the combination of:
table + action + scope, evaluated against record ownership.
For more details {click here} for the learn documentation.
A Side Rant about Sharing:
Sharing is powerful. Like really powerful.
A lot of people casually hand out share privileges because “out-of-the-box roles have it.”
That’s dangerous.
If your organization doesn’t understand sharing, doesn’t build a security model around it, and doesn’t govern it properly…. don’t use sharing.
Great power, responsibility, etc.
Step 3: Assign the Role and Test It
- Add a new user to your tenant & environment (just like before) named CSR User 2 or something similar. I also recommend once again a new browser identify for each user.
- Assign the User-Scoped Case Access role
- Use the URL directly in the new user’s browser to access Customer Service Hub or workspace.
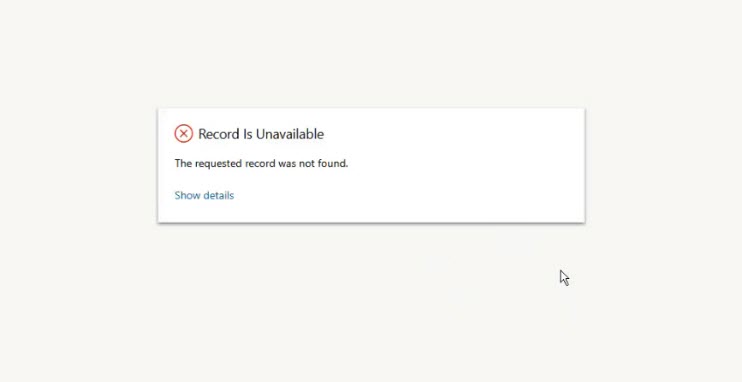
Hmmmm. Can’t access the app. This is to be expected overall, as we covered in the last part.
App Access
- Important: Creating a custom security role alone won’t grant app access.
- You must also share the app (Customer Service Hub or Workspace) with the new role using Power Apps.
- Go to Power Apps → Apps → Find your app → … → Share.
- Select your new role so users assigned to it see the app in their picker

Step 4: Validate the User Experience
So now we log in as the new CSR User 2 / refresh. The user can now open Customer Service Hub, but the navigation bar is stripped down: only features and tables they have access to will appear, and right now that’s just Case, basically (some other navigation elements appear, strangely, but trust me these are going to work in unpredictable ways). Also note that there’s a ton of permissions errors floating around – we’ll get to that

When viewing cases, nothing shows up (since none are assigned to them yet).So let’s have a manager (CSR 1) create and assign a case to this user. Once we hit refresh – now the user sees only the assigned case and can edit it, but not create new cases (because we didn’t give that privilege). Note that we can’t do much of anything else. We can’t use notes, activities, etc. we can view any details about any related record or even perform many actions – try using the various buttons that normally show up in the ribbon.
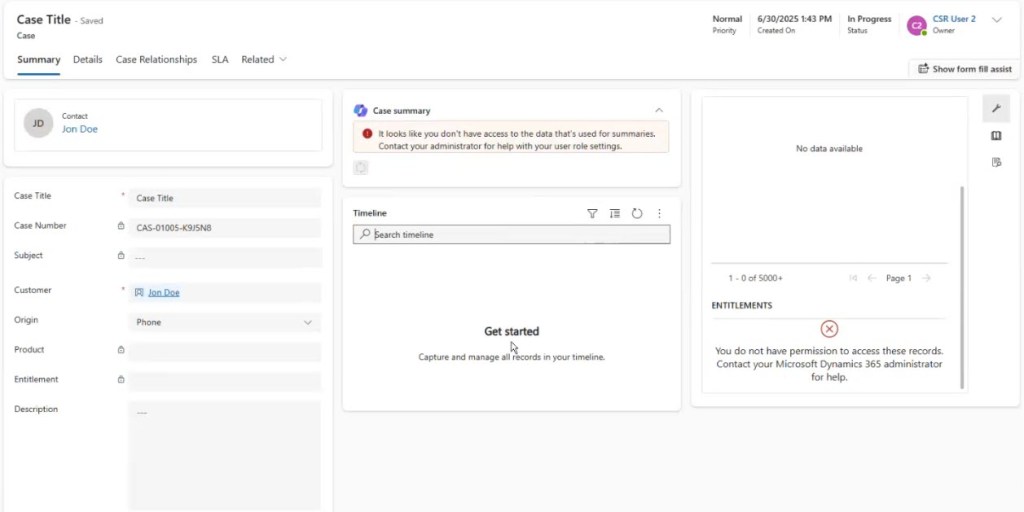
The bottom line: Just giving “user” scope to the Case table isn’t enough. The app will break or throw errors unless the user has a baseline of permissions to related tables (Contacts, Activities, Currency, etc.). So we have more permissions to build up. But hang on – how do you know which of the 10 million Dataverse tables your CSR needs access to, just to do their job?
This is why you almost never create a security role “from scratch.” Instead,
- Approach one: Copy an existing role (like CSR), then whittle it down or tweak as needed.
- Approach two: Take the “minimalist monk” route – define a minimal security profile, then bolt on the bare minimum permissions needed to breathe in the app.
We actually started with Approach Two, which is realistically not the approach you will normally take. But given that we started it, let’s finish it then look at approach one.
Step 5: The Reality Check – Minimum Permissions Required
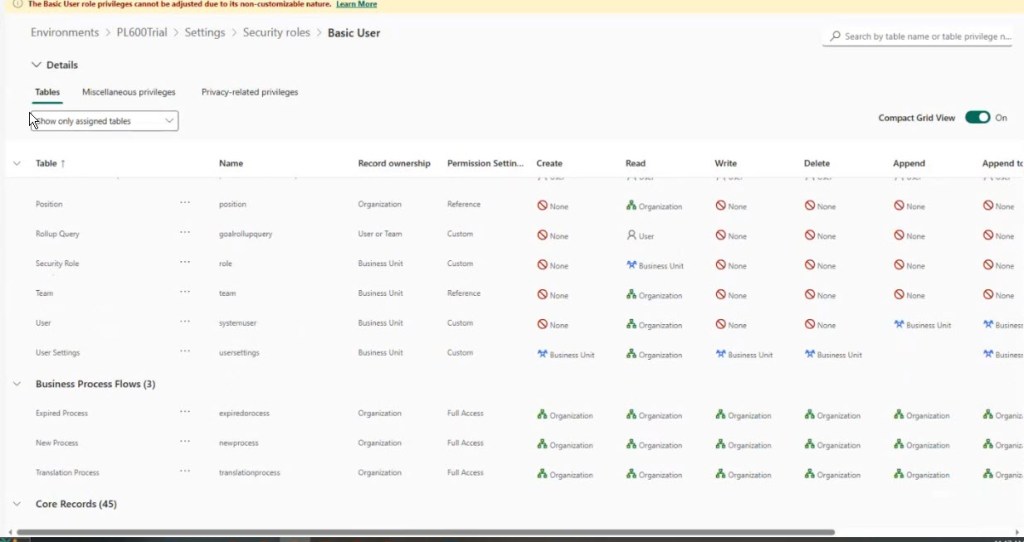
Solution: When dealing with Dynamics 365 Always assign Basic User and Customer Service App Access as your “base” roles, then layer your custom role on top.
- This gives the user the minimum required privileges for things like notes, timeline, navigation, and lookup fields to work.
- The Basic User role might not work for every D365 scenario because it grants too much access. For example it gives user-scoped access to contacts. If not all users in the system should be able to see contacts (under any circumstance) then the OOTB Basic User role won’t work.
- If this is the case – Clone and trim it like we are going to cover below
So, once you’ve assigned Basic User, Customer Service App Access, and the new role (which I named User-Scoped Access to Cases), then CSR User 2’s system should light up and become usable.
At this point you realize something:
If I want a user to have basically the same capabilities as a full CSR…
…but with only one difference (case privileges = user-scoped)…
Building that from scratch is a nightmare.
So we move to Approach One – the one you will almost always want to use: Clone an existing role and tweak it.
Step 6: An Easier Path – Clone and Trim a Default Role
Building a security role from scratch sounds “minimalist,” but 99% of the time, you’re better off copying an existing role (like Customer Service Representative), then reducing permissions on just the tables you care about.
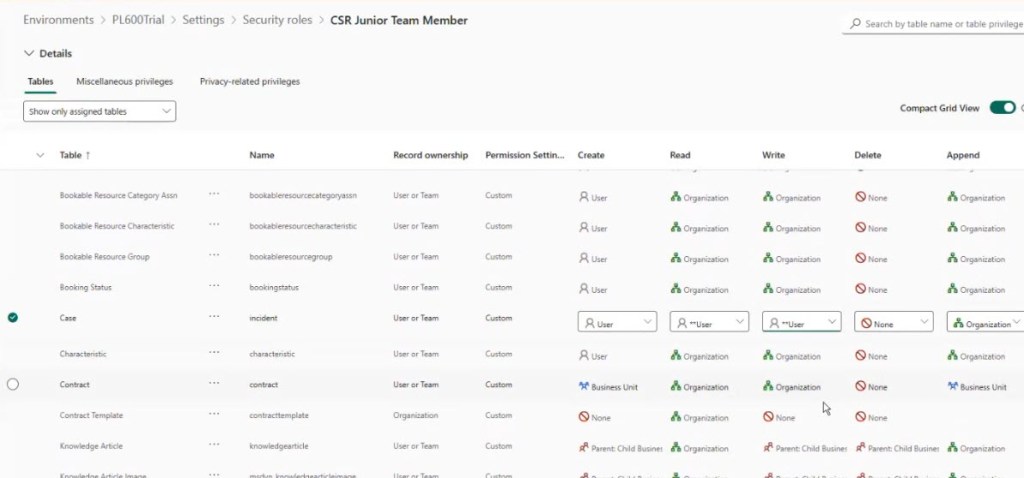
1 – Copy “Customer Service Representative” and name it “CSR Junior Team Member.”
2 – Change only the Case table’s permissions from “Organization” to “User.”
3 – Assign this to your junior CSR user. (I created yet another user and added it to my org)
4 – Finally, Also give them app access (assign them Customer Service App Access role, and/or Omnichannel User role for the CSW app) They’ll now have all the same system access as a full CSR except they can only see and edit cases assigned to them.
Step 7: Testing the Scenario
1. Create and Assign a case to CSR User 3 (as sys admin or CSR User 1)

2. CSR User 3 logs in (using direct URL Link), sees only their assigned case…Other than that they can do everything CSR User 1 can do
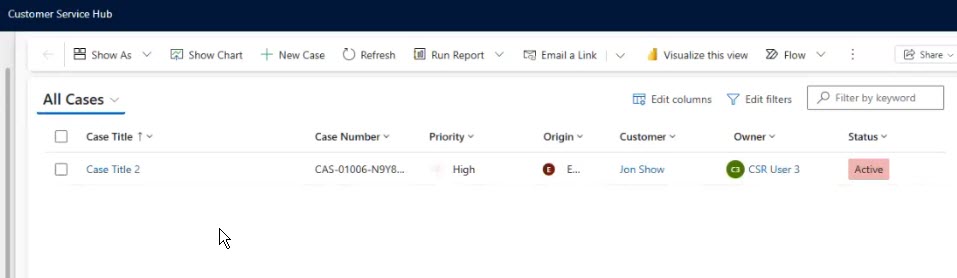
They see exactly one case — the one assigned to them.
Mission successful.
Summary / Takeaways for This Section
- User-scoped security is easy to set up in principle, but you must remember all the supporting permissions that Dataverse expects.
- ALWAYS assign Basic User and Customer Service App Access alongside your custom roles.
- Sharing the app is essential for the user to see it in their picker—roles alone aren’t enough.
- If you want a role with “all the features but limited case access,” copy and edit an existing role, don’t build from scratch.
- Expect to troubleshoot the “hidden requirements” of Dynamics until you get the hang of what those 10,000 tables are for.
