

In the last article I wrote on this subject, we talked a bit about the Create Portal Content wizard. In that article, we walked through creating a list of leads that displays on the portal. Anyone can access the list, and it’s read-only. Where can we go from here?
Perhaps we don’t want to allow any anonymous users to see our lead list because we only share this information with partners, for example. In this case, we want the ability to create new leads or edit existing leads from the portal, or to take actions on those leads. In other words, we want a secure list of leads that can be modified by those with the appropriate permissions.
For now, let’s not worry about the realism of this scenario. In a future post, I’ll show you how to build out an awesome portal, and we’ll look in more detail at a realistic business use case at that time. For now, let’s use this simple example to build our knowledge of how to manage permissions for entities exposed on the portal.
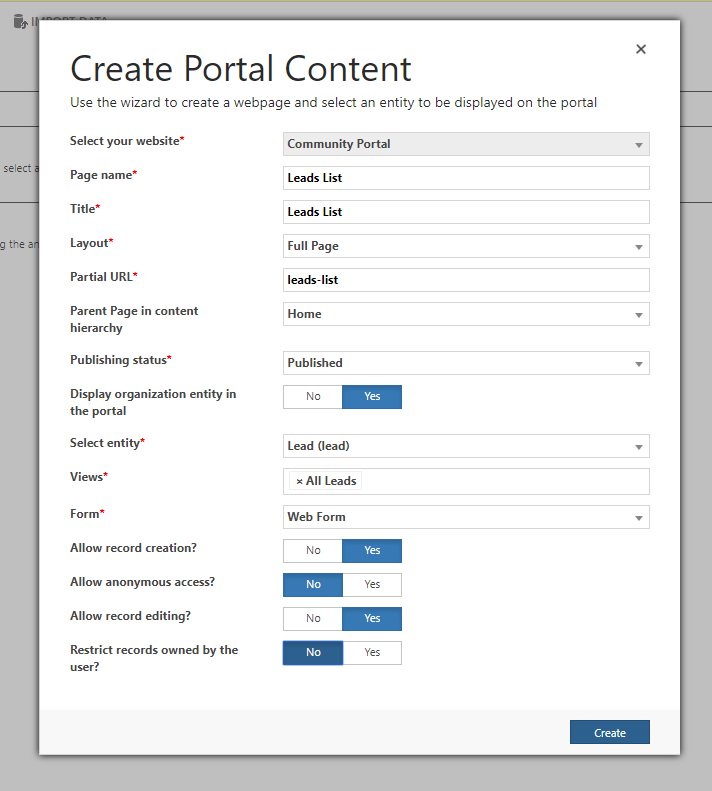
First, let’s go back and re-create our list using the wizard (I’ll show you how to modify an existing list in a future post). We want to do the following:
- Sign in to Dynamics 365.
- Go to Portals > Administration > Portal Management. The Portal Management page is displayed.
- Select Create Portal Content. The Create Portal Content window appears.
- Specify the basic required details. At a minimum:
- Your selected website
- The Page Name
- The Page Title
- Layout: The Page Template – Choose Full Page for this example
- Parent page in the content hierarchy: pre-populated with the Home page.
- Publishing Status
- Finally, for a basic page, set Display organization entity in the portal to Yes.
- Now let’s re-create our leads list with some different options selected:
-
-
- Select Entity: Lead (lead)
- Views: All Leads
- Form: Web Form (for now)
- Allow record creation? – Yes
- Allow anonymous access? – No
- Allow record editing? – Yes
- Restrict records owned by the user – No (we’ll explore this option later)
-
Now, let’s see what has happened on the portal. Load up your portal and navigate to the Leads List
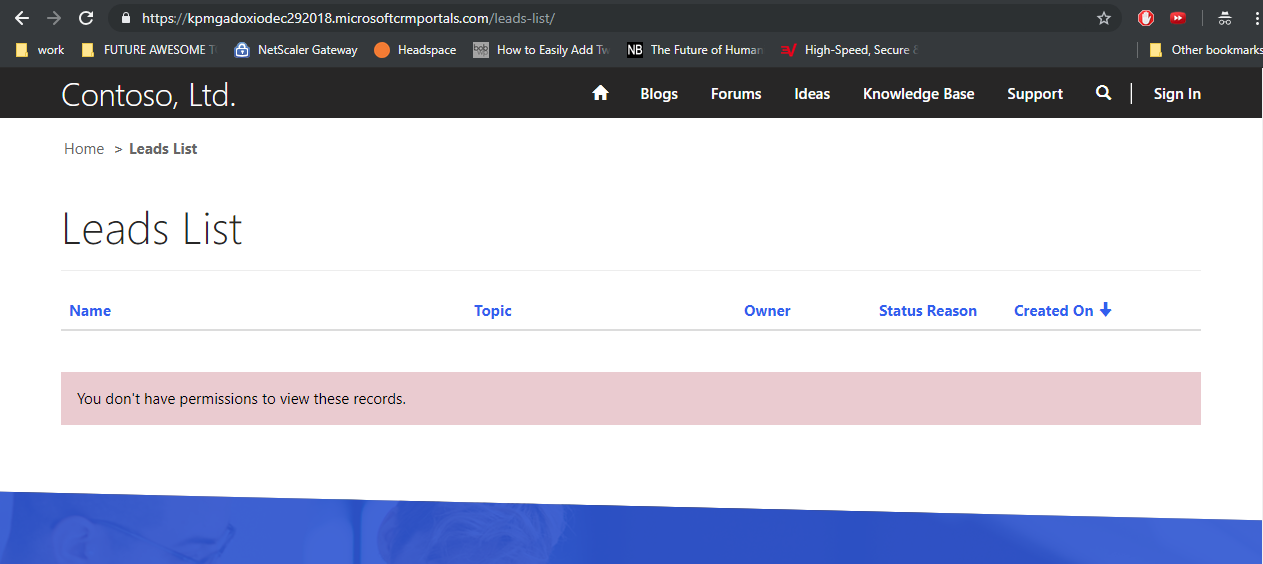
As you can see, you can no longer access the page anonymously. However, it is possible to allow a certain degree of record creation and editing to anonymous users. In fact, this functionality is key to certain scenarios. We’ll explore this more thoroughly in – you guessed it – a future article! For now, let’s just look at how permissions work.
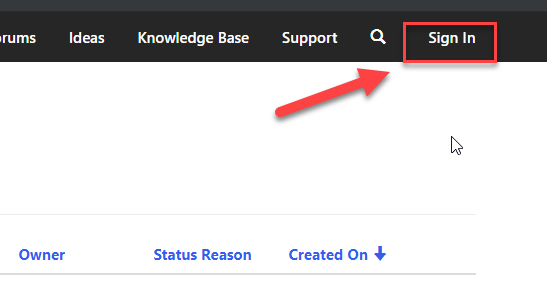
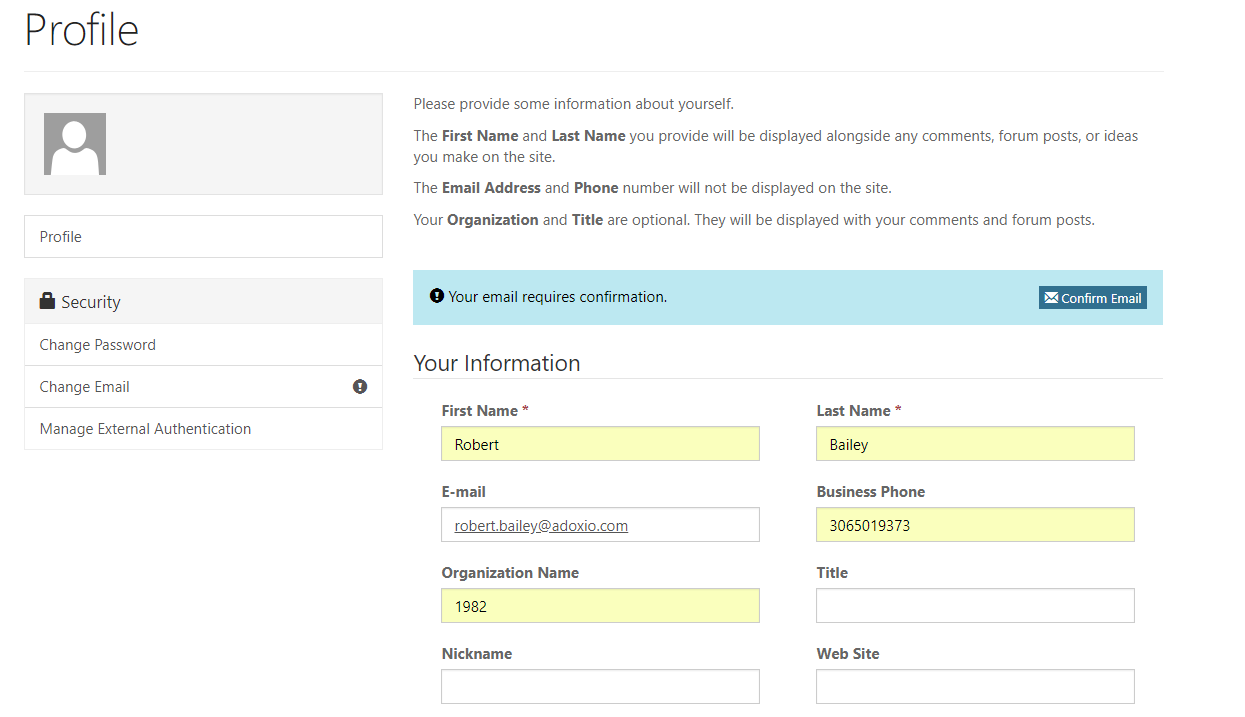
First, as a user of the portal, how do you gain access to this list? Well, right now the only requirement is to log in. We’ll look at the CRM side of things in a moment, but first things first: let’s create a portal user account by signing up:
- On the portal, Click on Sign In on the upper right-hand side of the main navigation.

- Now select Register.
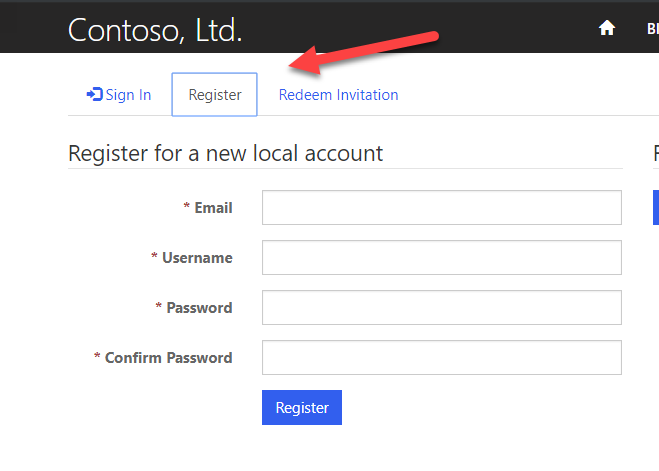

- Fill in the required details.
- You don’t need to confirm your email. Once you click Register, you are signed in. Fill out your profile with a first and last name and click Save.

How does all this work? Anyone familiar with portals will know that at this point a contact record has been created for this user in Dynamics – you can confirm this by searching for the contact with the first and last name that match what you entered when you registered on the portal. You also may have guessed that this contact is associated with the default web role by … well, by default. But wait – if you try to navigate to the leads list page, you’ll find that you still don’t have access to the list! That’s because the kid gloves have been taken off. By default, a different set of permissions exist for leads, so we’ll need to override that by creating an Entity Permission for the lead entity and granting it to the default web role.
- In Dynamics 365, go to Portals > Security > Entity Permissions.
- Create a new Entity Permission record.
- Enter a Name. This is just for reference; choose a name that will help you remember which record contains the permission you are creating.
- Choose Lead (lead) as the name of the entity for which you’re creating the permission.
- For the scope, choose Global: this is going to keep things simple and give access to all leads in the system to anyone with this permission.
- Assign the Privileges Read, Write, and Create.
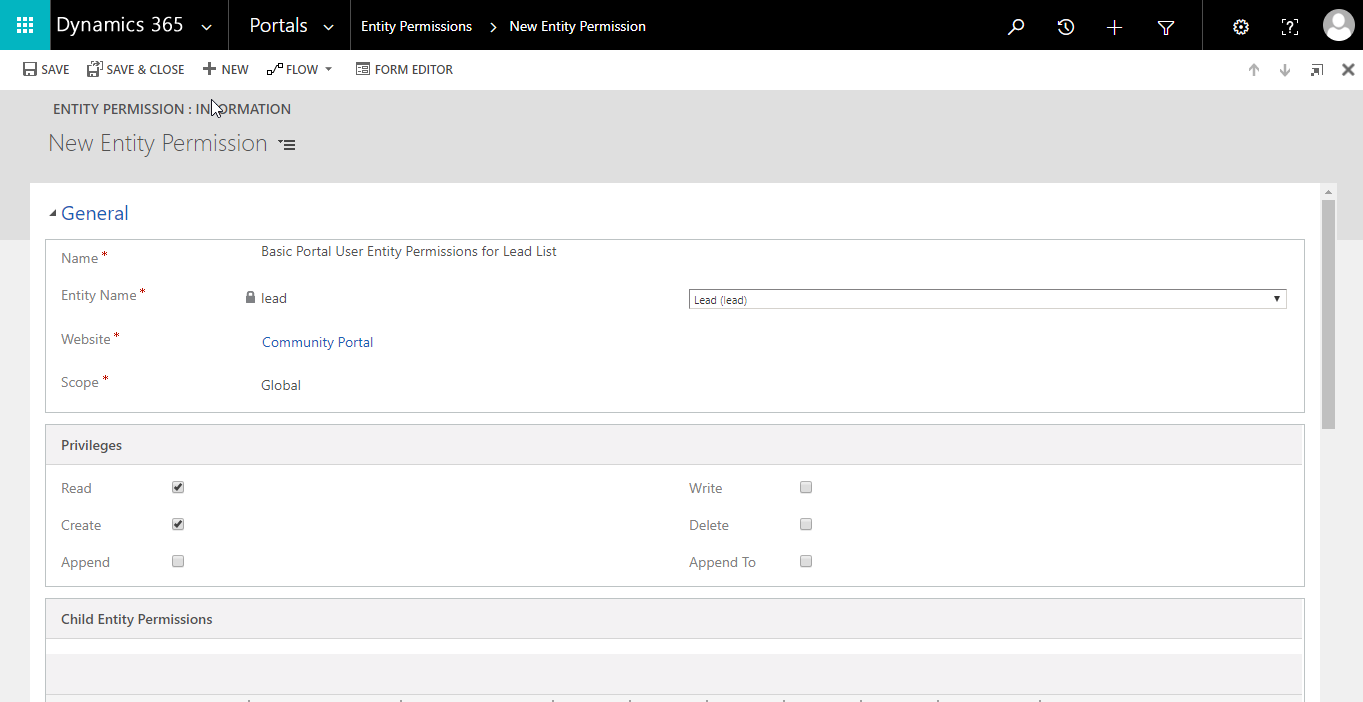

- Click Save.
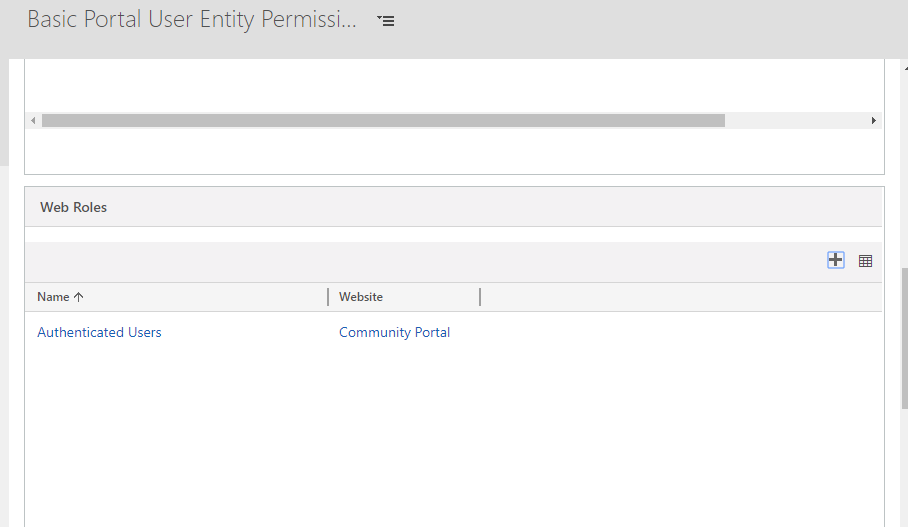
- Once the record is saved, scroll down to the Web Roles subgrid. From here, add the Authenticated Users role (this is the default web role).

NOTE: Regarding the topic of scope, I will be posting a full article on this topic alone – it’s a source of much confusion for people trying to configure out-of-the-box portals. For now, I suggest you read the Microsoft documentation on the subject.
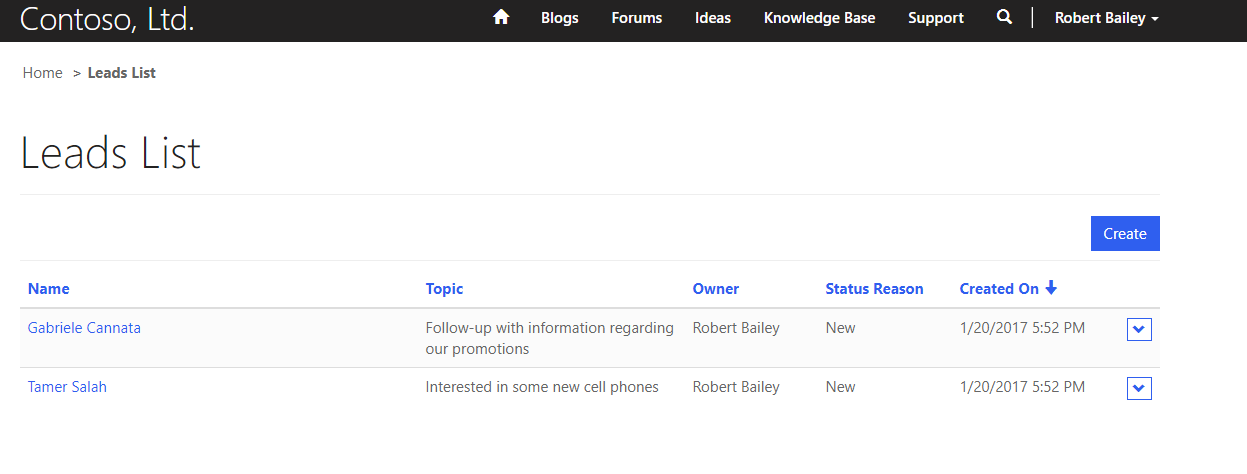
Now anyone who is authenticated will have access to all lead records in the system. Not only can we see a list of leads, we can also click on the individual rows to view the details of those records.
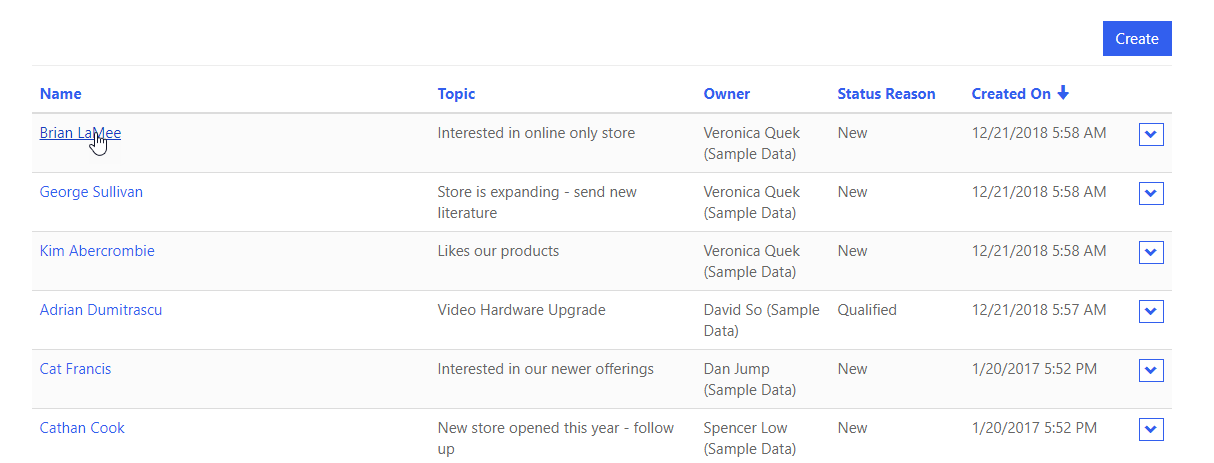
By clicking on the action dropdown on the right-hand side of each row, you can also access an Edit form (why the Edit and Details forms are separated by default is a bit of a design mystery, but it’s good to know the option is there – you can remove one or the other down the road).
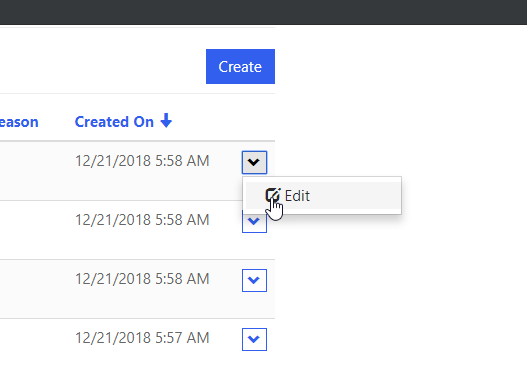
Finally, the Create button (shown in the above screenshot) enables you to create a new lead.
You can get more granular with the permissions that you add to a given web role as well. For example, in this case we did not give Delete permission (and in fact, you rarely would), but you could, for instance, give Create but not Write (update) permission to a user role, or vice versa.
Now, let’s get a bit fancier with our example. Say, for instance, that this Leads List is part of a partner portal, where we want to present leads to those in our partner network, and that anyone who has a portal user account is a partner (we’ll go through a full example of this scenario in a future post / series). In this case, most users are going to be in the Sales Manager role, a role that we can assign to users of the portal in order to give them access to leads that we have assigned to them or that they have created themselves – but no other leads.
The first step is to create an Entity Permission record to grant this permission set:
- In Dynamics 365, Go to Portals > Security > Entity Permissions.
- Open the entity permission record you created earlier in this exercise.
- For the scope, change the value from Global to Contact. This will change the permission so that it grants row-level access to only those records that are related to the signed-in user’s Contact record via a relationship that we specify.
- Choose the relationship that will determine related records. In many cases you will be using a new or custom relationship, but in this case let’s use the out-of-the-box N:1 relationship lead_parent_contact.
- Click Save.
- Once the record is saved, scroll down to the Web Roles subgrid. From here remove the Authenticated Users role. We’ll create a new role called “Sales Manager” that we’ll assign to our portal user.
- Click the plus sign to add an existing web role, and then click the search icon.
- Click New.
- Set the Name of the new record to “Sales Manager,” and make sure the Website is set to “Community Portal” or whatever portal you are using
- Click Save & Close.
- Now your new permission is now associated to the Entity Permission record.
You now need to associate it to the contact record for your portal user.
- Navigate to Portals > Security > Contacts and find the contact you created previously.
- Open that contact record
- Switch to the Portal Contact form
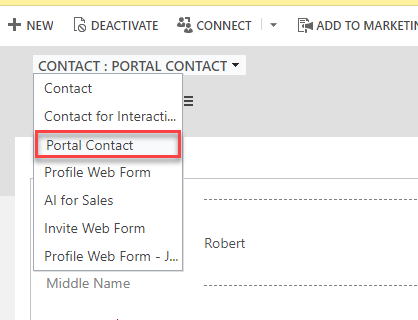
To finish, Under Details > Web Roles, add the Sales Manager web role.
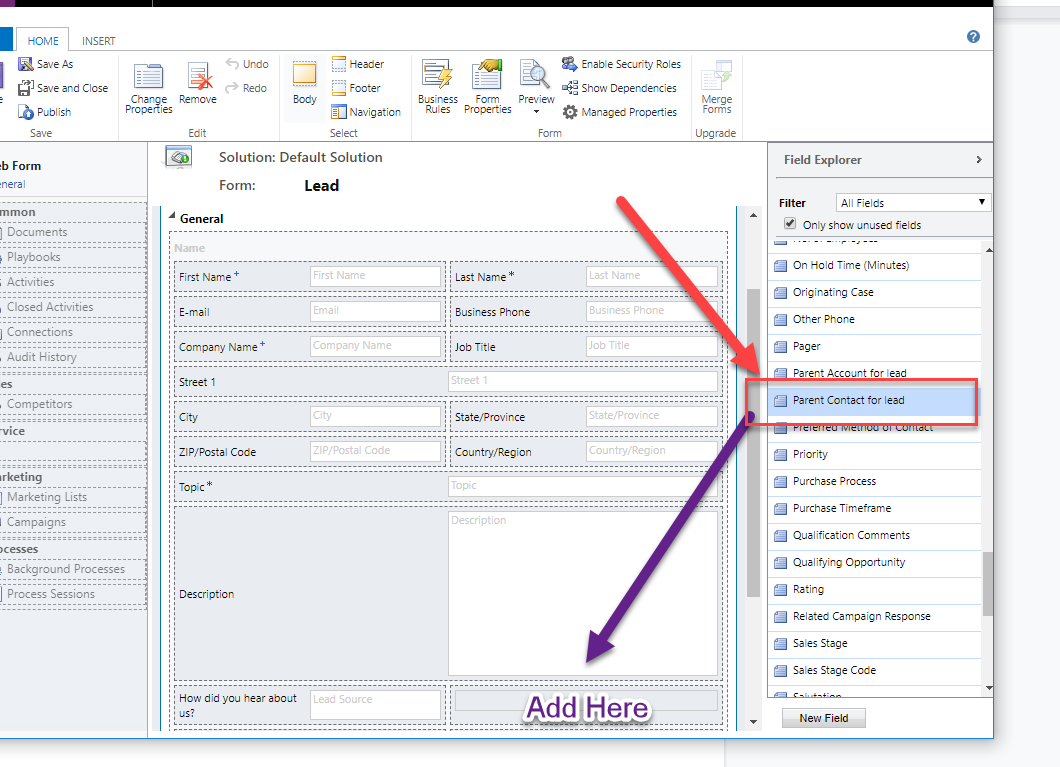
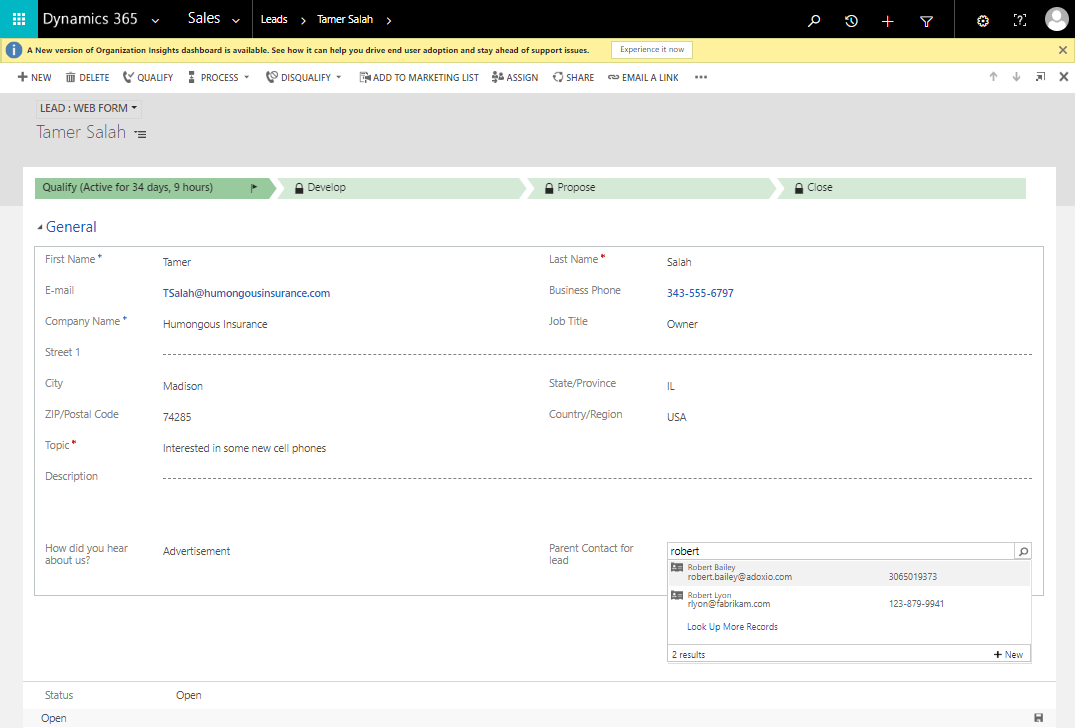
Now this Contact should only have access to leads that are related via the relationship we specified on the permission record – right now, there are none, since we haven’t been using this relationship yet. Let’s assign a couple of leads to this contact by navigating to the lead in the system and setting the lead_parent_contact relationship. To do this, we’ll need to add this relationship to a form, since it isn’t being used anywhere yet. We could add it to the main Lead form, but let’s add it to the form called Web Form instead. Recall that this is the form that we are using on the portal – we selected it earlier when using the Create Portal Content wizard.
Now, add the contact to a few leads …
… and voilà: on the portal, we have access to those leads, but only those leads!
Interestingly, right now you have the ability to create a new lead, but you won’t have access to it once it’s created. This would require setting the lead_parent_contact relationship when the lead is saved (I’ll show you how to fix this in a future article, so stay tuned). Also, notice that if you click into one of the leads, the lookup for Parent Contact will appear, but you won’t have access to set the relationship to any other contact in the system besides your own. This is because you don’t have append or append to permission for Lead, and you don’t have permissions for contacts in the system.
This makes sense – the sales manager is a partner and shouldn’t be assigning leads to just anyone. In a future article I’ll increase the realism and complexity of this scenario, but for now, let’s add a second custom web role called Channel Manager that can be used to access all leads in the system and assign them to contacts, from the portal.
- First register again on the portal with a new login. If you don’t want to be bothered registering again, you can use the default Administrator contact and assign it the Channel Manager web role that you are about to create.
- Create a new Entity Permission record – again for the Lead (lead) entity.
- For the scope, choose Global again – this time, it makes sense because the Channel Manager should have access to all leads in the system.
- Assign the privileges Read, Write, Append, Append to, and Create.
- Save the web role and assign it to the contact of your choosing.
Now, log out of the portal and log in as the Channel Manager contact. You’ll see that not only do you have access to all leads in the system, but you also have the ability to assign leads to contacts by using the lookup field on the edit form to set the Parent Contact for the lead. You can test this by assigning a new lead to the contact that you created at the start of this exercise, then logging out and logging in as that contact and checking the Leads List.
Hopefully you’ve had fun with this – but there is still so much more to cover! I could probably talk about this stuff forever, but for now you’ll have to wait for the next post in this series. That said, expect it a little sooner this time and for new posts to become more frequent.
Thanks for reading!

One thought on “Basic Portal Entity Permissions and the Create Content Wizard”