

In my post about the Create Portal Content Wizard, I talked about how easy it is to add content to the portal using point-and-click configuration, and demonstrated that the Wizard creates a whole lot of records in the background for you so that you don’t have to. It’s like magic! It certainly does beat having to spend the time configuring Entity Forms, Lists, Permissions, and web pages all from scratch. However, the Wizard also has its limitations. There are several scenarios that it simply can’t manage, including some fairly basic ones. The Wizard can also leave you with a fair bit of manual work or cleanup to do, depending on what you’re building.
In order to better understand the Wizard, I figure now’s the time to spell out exactly what records actually get created by the wizard. To do this, we’ll go through the different options for configuring a list (we care mostly about displaying organization entities, so that’s the focus of this article) and then see exactly what configurations are created with each and what changes occur with the different settings. If you aren’t familiar with the Wizard, I explain the steps for using it here. Read that first, then come back – this article is more of a deep dive.
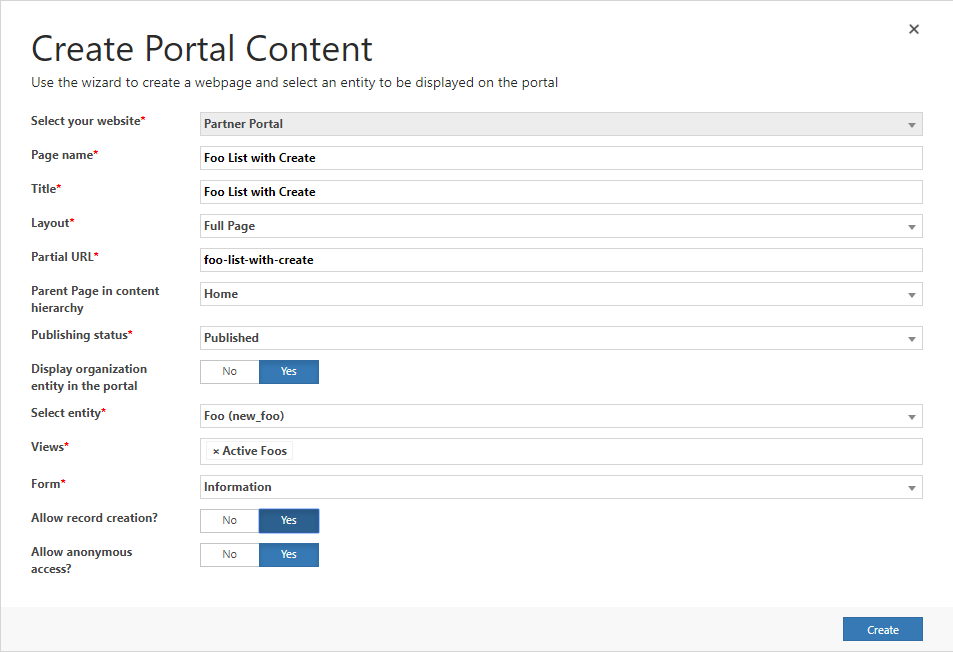
Let’s start with the basic case where we are not adding the ability to create or edit, and we do not require portal visitors to sign in to see the list. Note the field selections in the diagram below. The website, Page name, Title, Layout, Partial URL, Parent Page, and Publishing State can be whatever you want them to be – these don’t affect the outcome (well actually, they do, but not in a way that we are interested in – we can about the forms and lists and these don’t affect those).
Here we are using a Custom Entity called “Foo”. It’s just a basic, standard entity with a lookup to a contact and not much else – but you could easily use any other custom entity you want from your own scenarios – it’s just a placeholder. Just make sure it’s got a N:1 relationship to Contact. Don’t worry if your relationship name differs from later screenshots in this post.
We’ll set the Display organization entity in the portal switch to Yes, and then select our custom Foo entity. In the past we’ve used Leads and Contacts, but here we’ll stick with our custom entity, which is actually the most basic case. Choose whichever Form and Views you wish. The only fields that we are going to change across our different scenarios are those beginning with “Allow record creation”. Notably, we are allowing anonymous access and not allowing record creation for this first case.

This creates a Foo List on the Portal.

So what records exactly have been created by this process?
- An Entity List, named “<name of your page> Entity List”, with the following attributes and settings:
- Entity Name is set to the one you chose in the Wizard
- View(s), again, are simply those that you selected in the Wizard
- No Grid Configuration, surprisingly. Edit and whatnot are therefore not configured the ‘most correct’ way
- Page size set to 10
- Web Page for Details View set to a web page (more details on this later) created by the Wizard to contain the ReadOnly Entity Form. This means that clicking on any row in the list will open a new page, rather than a modal popup, with the read-only details.
- Entity Permissions are NOT enabled! This is despite the fact that the best practice is to always enable them, even if you aren’t using any features that require them (which our Foo List doesn’t). This is also despite the fact that they are enabled for the ReadOnly view and are therefore created by the Wizard anyway!
- An Entity Form, named “<name of your page> Details”, used for viewing read-only details, with the following attributes / settings:
- Entity Name is set to the one you chose in the Wizard
- Form Name once again is set to the one you chose in the Wizard
- Mode is set to ReadOnly
- Source Type is set to Query String (it’s always set to this when used in conjunction with an Entity List – we’ll talk about this more in a future post)
- Enable Entity Permissions enabled – despite the fact that we are allowing anonymous access and are using no features that require entity permissions, permissions are still enabled, which is the best practice. The fact that Entity Permissions are enabled also clearly indicates that at least one Entity Permissions record has been created.
- A Web Page with the name that you set in the Wizard’s Page name field; this page contains a lookup to the Entity List we just created.
- Website, Parent Page, Partial URL, Page Template, and Publishing State are all set as specified in the Wizard, while all other attributes are set to their default values.
- No Access Control Rules have been created for this page.
- A second Web Page with the name “<name of your page> Details”; this page contains a lookup to the read-only Entity Form for the Details view.
- Parent Page is set to the first Web Page (i.e. the one with the lookup to our Entity List)
- Partial URL is “<partial URL of parent>-details”
- Page Template is that of the Parent Page (you’ll often want to change this!)
- Publishing State is that of the Parent Page.
- It’s Hidden from Sitemap and excluded from search
- No Access Control Rules have been created for this page, either.
- Finally, an Entity Permissions record named “<name of your page>_EntityPermission_<entity logical name>” (an oddly formatted name…) and with the following attributes / settings:
- Entity Name is set to the one you chose in the Wizard.
- Website – same deal.
- Scope is set to Global
- Privileges is set to Read
- Web Roles is set to the Anonymous Users role
Why wouldn’t Entity Permissions be enabled for the List if they are enabled for the form? Why use a Web Page for viewing details, rather than a Grid Configuration? These may seem to be weird choices, but I’ll shed more light on them in future blog posts, when I’ll talk more about how to configure Entity Lists and Forms, and what their settings really change.
Now, how about the scenario where we do allow both record creation and anonymous access? (If you’re following along and trying this for yourself, then you’ll want to either choose a new entity to use for each scenario or delete the records (in particular, the entity permissions) created in the previous scenarios. I’m taking the latter option here.)
When you click Create, you end up with a list which is identical to our first one, except that it enables you to create new Foo records on the portal. Again, you cannot edit existing records on the portal – only create new ones. To enable editing, you’d need to make a bunch of additions.

For now let’s just see what changing this one option did.
- We have an Entity List, exactly as before, but with one important difference:
- On the Options tab, there is now a Grid Configuration for the Create button. This grid configuration adds a Create button that causes a new record to be created via a redirect to a web page that has also been created for this purpose (we’ll discuss this web page in a moment). Note that Entity permissions are still not enabled, oddly. If the Create button used a modal popup rather than a redirect to a web page, the configuration would be broken: very strange choice by the development team here!
- On the Options tab, there is now a Grid Configuration for the Create button. This grid configuration adds a Create button that causes a new record to be created via a redirect to a web page that has also been created for this purpose (we’ll discuss this web page in a moment). Note that Entity permissions are still not enabled, oddly. If the Create button used a modal popup rather than a redirect to a web page, the configuration would be broken: very strange choice by the development team here!
- An Entity Form, named “<name of your page> Details” as before, used for viewing read-only details, with the same configurations and attributes as in the first scenario.
- A second Entity Form named “<name of your page> Create” for the create operation, with the following attributes and settings:
- Entity Name set to the one you chose in the wizard
- Form Name once again is the one you set in the wizard, meaning that if you wanted a separate form to be used for edit and create, you would need to come in and make these changes manually
- Mode set to Insert
- Enable Entity Permissions set to Yes (i.e. the check box is selected)
- On the On Success Settings tab, On Success is set to “Redirect”, and Redirect is set to the web page you created with the Wizard.
- On the Additional Settings tab, note that Associate Current Portal User on Insert is set to No (i.e. the check box is clear). This means that when a portal user submits the record, there will be no record of who did the submitting. This makes a certain amount of sense, since anonymous users don’t have a Contact record. Most scenarios will call for this association, if possible, so you’ll need to set this manually.
- A Web Page with the name that you set in the Wizard, with a lookup to the Entity List that was created.
- A Web Page with the name “<name of your page> Details”, with a lookup to the Entity Form for the Details view (ReadOnly), just as before.
- A third Web Page, named “<name of your page> Create”, with basically the same settings as the Details page, except that this page includes a lookup to the Create form.
- Finally, an Entity Permissions Record with the name “<name of your page>_EntityPermission_<entity logical name>” and the following attributes and settings:
- Entity Name is set to the one you chose in the Wizard
- Website – same deal
- Scope is set to Global
- Privileges include Read and Create
- Web Roles is set to the Anonymous Users role
I think the most important thing to note so far is the use of Entity Permissions, which are turned off on the lists (meaning that you’ll need to turn them on in order to add most grid configurations) yet turned on in the case of the forms. The Entity Permissions are set up for you automatically by the Wizard.
Another important thing that I’d like to point out, if you are creating lists for OOTB entities like Contacts, is that most portals have certain permissions set up for these entities already, and the new ones created by the Wizard will frequently overlap with these, leading to unpredictable results.
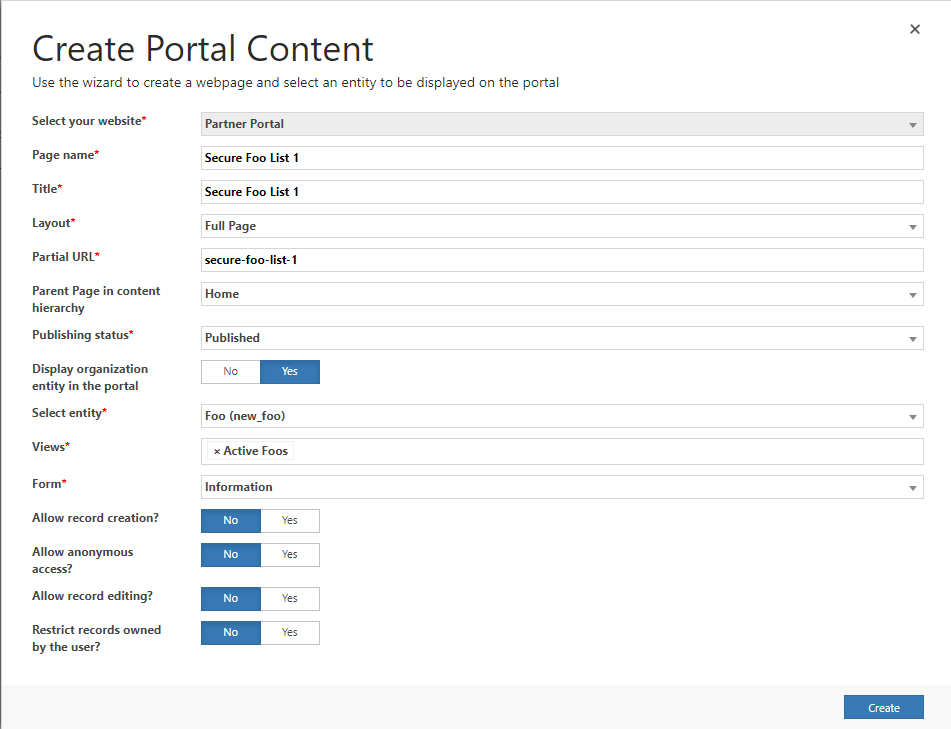
Now, let’s try turning off Allow anonymous access. This will have the effect of turning on entity permissions for the list, which will open up a range of other options that will appear in the Wizard. We’ll leave those options set to “No” for now.
Now we need to be logged in in order to use the list – that much is for sure. Indeed, if you navigate to the Web Page on the Portal you’ll get a permissions error:
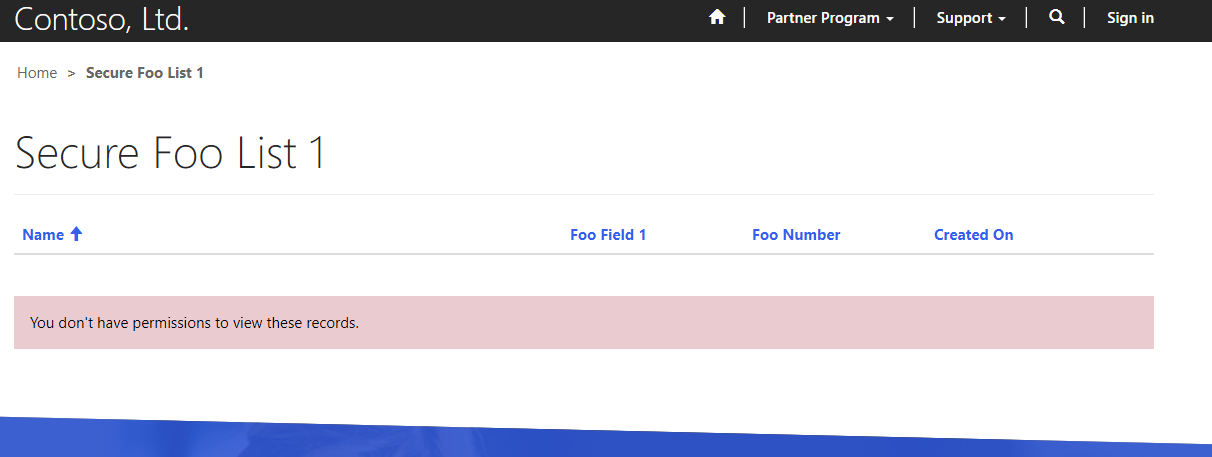
Oddly, this error is on the list, so you can’t view the records, yet the page itself isn’t locked down. It’s a bit amateurish, but there you have it. I’d recommend locking the page down if it’s not valid for anonymous users to access the list. OK then, let’s log in. We just specified that anonymous users cannot access the list, so if you log in, you will be able to see it, right?

… hmmm. Well, that didn’t work. What’s going on here? Clearly there is more configuration that needs to be done. In other words, the configuration that comes out of box using the Wizard is broken by default in this case. In order to understand why, let’s talk about the records that were created.
- An Entity List, exactly as before, with just one important difference: Entity Permissions are now enabled. This is very odd, since again there’s no reason they weren’t enabled in the earlier scenarios. You can allow anonymous access to a secured list: just grant permissions to anonymous users. In fact, this was done anyway: the Entity Permissions ended up being created for you exactly as you’d need them. So it’s odd that the developer(s) of this Wizard made the decision to relate the “Allow anonymous access” setting to the turning entity permissions on and off on the list. All other options are the same as in the first scenario.
- A ReadOnly Entity form, just as in the prior scenarios, with no differences.
- Two Web Pages, just as in the first scenario. No differences here.
- One Entity Permission record. This is where the difference occurs and the problems arise:
- Entity Name and Website are set to the ones you chose in the Wizard.
- Privileges include only Read, since we didn’t enable Create in the Wizard
- … and here’s the weird one. The Scope has been set to ‘Contact’. This means that contacts logged in must have a record-level relationship to the records you are exposing on the list or they won’t appear. This isn’t at all implied by the settings on the Wizard. We didn’t choose “Restrict records owned by the User”, the implication is that if you are logged in you should be able to see all records. Therefore the Scope should be Global. This isn’t why you are seeing the error message, but even if we got past that, you still wouldn’t see any records since…
- Contact Relationship is Not set, despite being a required field. So yeah, it’s broken. Pretty disappointing. You can fix it, but it’s odd that they are setting the scope to Contact at all since record-level security isn’t implied by the settings we set on the wizard. We explicitly chose NOT to “Restrict records owned by the user,”!!! So this is a defect with the Wizard. Now, in terms of it being blank despite being a required field – turns out this is actually a bug, because it doesn’t let you proceed without specifying a contact scope the second time you go through the wizard

- Finally, to pour more salt in the wound, the Entity permission isn’t assigned to any Web Role! This is why we are getting our error message despite being logged in. The settings we chose in the wizard clearly implied that the Entity permissions should be assigned to the “Authenticated Users” web role.
So, if you choose to not allow anonymous access, but still want a read-Only list, you’ve got a lot of manual work to do. Also, despite choosing to not restrict the results by user, the configuration implies that you want to do exactly that (yet is incomplete).
Ok, let’s see if changing some of the settings on the wizard will give us a different result. Remember to set the Contact relationship, since that’s required if anonymous access is disallowed … that is, assuming the option is presented to you. You’ll find that if you allow record creation but leave all other options the same …

…you’ll find that the only difference is that grid configuration is used to add a create button (via redirecting to a new web page with a create entity form) and that the Entity Permission that is created (but still not assigned to any web role) now has create permissions added. Ok, let’s try enabling record editing:

Now the list records can be edited. You can only see any records if you are logged in with a web role that has the Entity Permission that’s been created (this doesn’t work by default in this scenario, as before) AND the contact record that you have signed in with is related to the records on the grid. Assuming we can see the list, the individual rows will be editable. There are some oddities, however. We’ll get to those.
Let’s look at the records creating in this scenario:
- The Entity list is created with most of the same options as in the base case. Entity permissions are enabled. Note, however:
- The Web Page for Details View is still set as before. Note that the option is certainly available to make the details page an edit page, rather than a read-only page, but this option isn’t set by the Wizard. The details page is still read-only.
- Entity Permissions are enabled.
- On the Options tab, there is now a grid configuration for the edit button. The Edit button is separate from the details view. The details view is, in theory, what you get if you click the name of the record in the link (a hyperlink), while the Edit button on each row is a record action. You could configure a read-only action as well, but again, that option isn’t being used. The Edit button is set to redirect to a web page – no modals are being used in any of these configurations.
- Two Entity Forms, the first as before, used for viewing read-only details, and a second entity form for editing, named “<name of your page> Edit” and with the following attributes and settings:
- Entity Name set to the one you chose in the wizard
- Form Name is once again equal to the one you set in the wizard, meaning that if you wanted a separate form to be used for edit and create you would need to come in and make these changes manually
- Mode is set to Edit
- Source Type is set to Query String
- Entity Permissions are enabled
- On the On Success Settings tab, On Success is set to Redirect, and Redirect is set to the Entity List portal page upon submit
- On the Additional Settings tab, note that the entity form is still not configured to Associate the Current Portal User Contact on Insert, so you won’t have access to the very records you create as a portal user. A bit of an oversight, to say the least!
- Three Web Pages. The first has the name that you set in the wizard, and has a lookup to the Entity List that was created. The second Web Page has the name “<name of your page> Details” and has a lookup to the Entity Form for the Details view (ReadOnly), just as before. The third is a new page named “<name of your page> Edit” that has the basically the same settings as the Details page but has a lookup to the Edit form.
- Lastly, we get to the Entity Permissions Record. It’s exactly the same as before (still the same issues) but with the addition of the Write permission. So you can edit records, but only if they are related to your contact record.
Note that enabling both Create and Edit in the Wizard adds the Create button back in just as before – so all the things that happened in the scenario where we did that previously will happen this time around as well.
Let’s try one last thing. Recall that as soon as you turn off anonymous access, it changes the scope of the created permissions to “Contact” (for no real reason). This is despite not selecting “Restrict records owned by the user.” Well then, what if we actually want to restrict the records shown by the logged-in user’s Contact record? Since we are already doing that, what in the dickens does actually setting the value in the Wizard to “Yes” do for us?
The answer, surprisingly… is nothing. Nothing at all. Again, a bug with the tool.
Ahem … the bottom line here is that you can’t use the Wizard to create a secured list and expect it to work out of the gate – you will need to do some cleanup first!
I hope this article was useful to you in terms of demystifying the Create Portal Content Wizard. It’s a super-useful and convenient tool, but it does have limitations, meaning 90% of the time you’ll still need to tweak the records it creates to get the behaviour that you really want. Nonetheless, it’s a huge time-saver, because – trust me – creating and properly configuring all those records manually is much more work.
Stay tuned – there are more great articles on the way! Next in this series, I’ll be talking about modifications you can make to Entity Forms and Web forms with point-and-click configuration. I’m also going to start up a new series about the business value of the OOTB Portals, such as Community and Partner Portal, and ways to enhance those Portals.
Please follow me on twitter and LinkedIn and as always subscribe to my blog. Also, check out the post on the Adoxio blog.

tldr: Microsoft portal dev team sucks at building functionality that is supposed to reduce effort.
LikeLike