

Ever wanted to connect with your customers on a certain issue extremely quickly and won’t want to put much fuss into it? Sounds like you need to push out a survey in a matter of minutes – and want a robust place to store it that integrates with your existing systems. SurveyMonkey probably immediately springs to mind, but the frustration of that service is you are ultimately going to be exporting that data and transforming it to do your own analytics on it. Wouldn’t it be nice to have a very quick way to put out a survey, but leverage your existing O365 environment and CDM/CRM database? Of course it would! That’s were Microsoft Forms comes into play.
Now if you live and breathe Portals like me, you’ve probably thought about the best solution for getting feedback from customers on a Portal. Traditionally, Web Forms was the answer. You build out a custom entity for the survey, with records being responses. It gets surfaced on the portal, and it certainly has a full set of features to use. If you want to email out surveys, you email links to the survey on the portal. This works well, and the survey is customizable with liquid templating and web development. The downside is that it’s a heavy life to add a Survey to a Portal. even a short, simple survey can take hours. With Microsoft Forms, you can put out a simple survey and hook it up to your CRM in seconds.
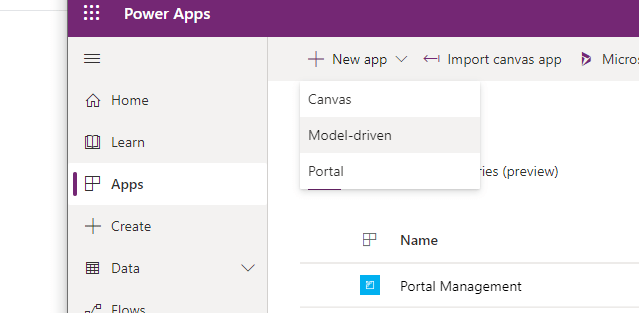
Microsoft Forms has been around for a while, but with the Power Platform hooked up its easier than many probably think to hook it up to a CDS database (or Dynamics 365 CE environment. You just need to set up the form, set up a CDM entity to house the data – and a Model-Driven App to surface it, if you don’t already have one, and a flow in Power Automate to get the data from the form submissions into your CDM database.
Step one: Setting up the Form (<10 minutes)
OK, so the first step is to set up a very simple form example. For my simple example, I’m going to set as generic as I can get. I’m creating a “registration survey” form, that can stand in either for a registration scenario, or a feedback form. One of my favorite things about the Microsoft SaaS stack is that once you’ve got a tenant set up, you can get to everything you’ve got (using single sign-on) by going straight to portal.office.com. If you don’t have an Office 365 environment to use, you’ll need to get one set up. One way to do this is to sign up for a free Office 365 trial.
- Let’s begin by simply adding the form
- Navigate to portal.office.com.
- Go to Apps > Microsoft Forms
- Under My Forms > click New Form

- Add your title i.e. “Registration Form”

- Add questions
- To add a question just click “Add New”
- Choose the type of question you want – we will create 4 text questions and one rating question – and away you go. It takes seconds to add a question.

- The validation options are not as fully featured as you might want – but remember that Microsoft forms is meant to be as quick and streamlined as possible.

- Although you can’t add any phone or email validation, you can add a subtitle to remind the user of the correct format.

- The rating question allows for a star rating out of 5.

- Distribute the form. You don’t need to save it, although you can preview it. Just grab the link to the form by clicking “Share”. Be sure to change it so that anyone with the link can fill out the form i.e. “register / give feedback”. In real life, you’d have an auto-mailer and mailing list set up but for this simple example we’ll just copy and paste the link in order to test our app

STEP TWO: Setting up your CDS data and app (<20 minutes)
The next step is to set up our App and data. You’ll need a Power Apps or Dynamics 365 CE subscription in order to set up apps, and if you don’t have one, remember you can always sign up for a free trial and add it to the tenant you are using for this practice. This part takes a while, and isn’t included in the “20 minutes” estimate 🙂 Here’s a great blog post explaining how to do it. Assuming this is the first app you’ve built in this tenant, you may want to create a new CDS environment as well, as as always it’s best practice to create a new solution and work from within it when creating your Entity and App.
- The next step is to set up our App and data.
- Navigate to make.powerapps.com.
- Choose which environment to work from, assuming you have multiple to choose from.
- If you are creating a new environment, make sure you create a database to go along with it
- Since it’s best practice to always work from a solution when adding entities to your CDS database, we’ll start by creating a new solution. This step takes a minute or two, but doesn’t extend the time needed to set up that much, and can certainly be reused for all future survey customizations.
- Navigate to Solutions and click new

- Enter all the needed details for your solution.
- For my screenshots, I didn’t bother to create a custom publisher, but if you want a nice prefix on the logical names of your entities, you’ll want to set up one.

- Navigate to Solutions and click new
- Next we’ll add an entity to our solution this entity will just store the registrations / Survey submissions as-is. In real life we would want to maybe separate contact information from other survey information. We’ll save that for a future post.
- Browse the solution we created then click “New > Entity”. I’m going to call mine “Registration Survey”.
- Fill out required fields

- Next we’ll add our attributes to the Entity that match the fields in our form. So, we’ll need 4 Text fields (single line of text is fine) for First Name, Last Name, Phone Number & Email; and a number field for our rating. Just add the fields to your entity one by one.

- For each field, do the following:
- Click “Add > new field”
- Enter Display Name
- Choose Type = Text or Number (for rating)
- Click Done
- Once you’ve added your fields, you’ll need to add an app to your solution.
- From the solution view, click “New > App > Model Driven”.
- Name the App whatever you like
- make sure you use your existing solution to create it – Choose to create from existing solution.
- You’ll be prompted to choose the solution package; choose the solution you created earlier
- From the solution view, click “New > App > Model Driven”.
- Once the App is created, you’ll end up in the App Editor where you can edit the Sitemap (which you’ll need to do since there is no Sitemap yet) as well as add Entities to your app and modify the forms and views.
- Edit the main information form of the registration survey entity. Just make sure that all the fields we added are on the form. No need to get fancy for this simple example.

- Next, Edit the active registration surveys view (the main default view for active records) so that you can see those fields that you’ve added.

- Finally, let’s edit the sitemap and publish the app.
- Click to edit the Sitemap, and give a Name to the main area of your sitemap. You’ll only need one Subarea for your Registration Survey Entity. Set it up somewhat like this:

- Click to edit the Sitemap, and give a Name to the main area of your sitemap. You’ll only need one Subarea for your Registration Survey Entity. Set it up somewhat like this:
Great, now your app is ready to use. But we want to collect data from our open registration survey form automatically in response to form fills, and in order to do that we need to stitch this together using Power Automate.
Step Three: Setting up a Flow to get the responses into your CDS database (<10 minutes)
- First, Navigate to Power Automate and be sure that you are browsing from within the same environment that holds your CDS Registration Survey Data and App.

- Create a new flow.
- Click “Create”

- Choose to create a new Automated flow. This means that we will be choosing a trigger for our flow.
- Click “Create”
- Choose a trigger for your flow. Fortunately for us, the trigger for a Microsoft Form response coming in is likely to be one of the suggested triggers that will pop right up, but even if it isn’t just do a quick search and you’ll find the correct trigger.

- Search for “When a new response is submitted”
- Confirm the trigger
- Add the Trigger details: For Form ID, choose the form you created earlier. Since you are using the same O365 tenant that you created your form in, it should pop right up

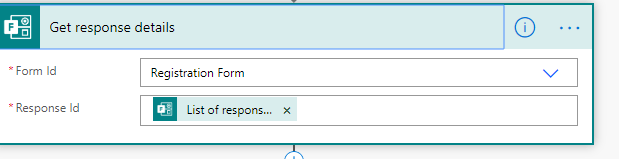
- Add the step to Get the response details
- Click “New Step”
- Search for “Get the Response details” and choose the Microsoft Forms Action
- Choose the form you created earlier for Form ID
- For Response ID, dynamically select “list of response notifications” – this generates the function “triggerBody()?[‘resourceData]?[‘responseId’]” – but the beauty of Power Automate is that we don’t need to care about that if we don’t want to.
- Add the step to move the data into CDS
- Click “New Step”
- Search for “Create new record” and be sure to select the Common Data Service action. If the action does not appear in search results, it’s likely because you are not in the same environment as your CDS database (but rather the default environment for the tenant) so be sure to check that.

- For Entity Name, choose the entity you created earlier (I name mine ‘Registration Survey”
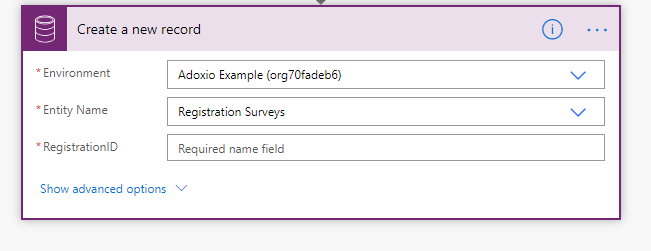
- For the Primary field (usually “Name” – I called mine “Registration ID”) you can put something like ‘Response received on” and then the dynamically – selected submission time (as shown -pardon the typo)
- For the remainder of the fields, dynamically select the appropriate field from the response details. when you click on the field, you will get the ability to choose dynamics content, just pick the appropriate fields.
- For Rating, you’ll need to convert the value from text to integer. First, click “Expression” and choose Int(value) to populate the expression field in the dynamic editor

- Then go to Dynamic Content and choose your rating question from the response details:

- Save the flow! Click “Save” at the upper right and the flow is ready to go.
Now that you are all done, let’s see it in action, first, follow the link you shared earlier to take the “survey” yourself (or register for whatever – again it’s a scenario-agnostic example). Once that’s done, pop open your Model-driven app and behold the data!


I hope you’ve enjoyed reading. This generic example was extremely simple, but it shows just how quick and easy it is to set up a Microsoft Form and pull data from the responses automatically into CDS and surface it in a model-driven app. In the future we’ll look at doing this vs. using Web Forms on a Portal for surveys – which is the better solution and when should you use both? See you next time!

Great article Robert, thanks!
LikeLike
wow!! 60How to enforce confirmation of email before enabling Portal functionality
LikeLike