

A common requirement I’ve come across is the requirement to force user to confirm their email before accessing Portal Functionality. Out of the box, users can simply sign up and away they go – they are taken to their profile and can then browse about the website. Now, most people implementing portals have some understanding of Web Roles and Web Permissions, but the confusion is how to tie those permissions to the confirmation of the email – and how to improve the sign up experience to make the whole thing more seamless.
There’s two basic approaches. The first is to use the out-of-the-box Portal sign up experience and then Assign the correct Web Role(s) to users only once they have used the (out-of-the-box) email confirmation function. (You can learn more about creating web roles here: https://docs.microsoft.com/en-us/powerapps/maker/portals/configure/create-web-roles/)
The second approach is to turn off open registration and make your Portal Invite-Only. (Learn about invitations here: https://docs.microsoft.com/en-us/powerapps/maker/portals/configure/invite-contacts ). This might not sound like the desired path if you want users to be able to freely sign up, but don’t worry – we will let them up, we just need to create a custom signup form (which is just an entity form that create a contact: https://docs.microsoft.com/en-us/powerapps/maker/portals/configure/entity-forms ) and then configure a workflow to send the invite to anyone who signs up. This method will allow you to have the more typical web experience because you need to confirm your email first, before you even land on the profile screen.
Let’s look at both of these methods.
Using OOTB Registration
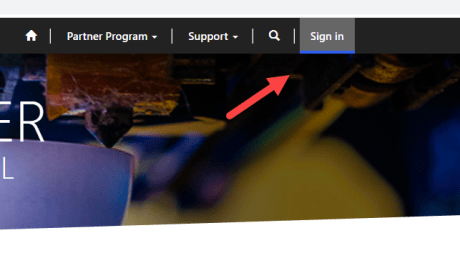
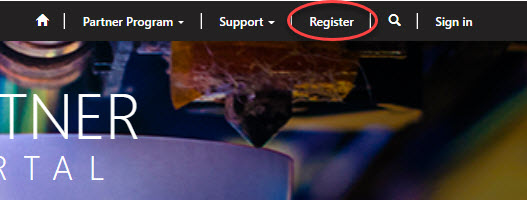
This is the easiest method to configure. Using the default registration method, when open signup is enabled (which is the default setting) users can sign up freely by clicking “Sign In” on the header, which will take them to the authentication page, from where they can click Register.
They will authenticate using B2C or (will pick a username and password if you are using local forms-based auth) and then will immediately be authenticated and taken to their profile.

Once we are on the Profile Page, we’ll be prompted to enter in our contact info, which is blank in the system at this point. One thing to note, is that at this point, a stub contact record has indeed been created within the database, with a blank First Name and Last Name. We also have the default authenticated web role, so we are free to navigate away from this page provided that other parts of the portal are not locked down by web page access control rules. This in and of itself might disqualify this path depending on your exact requirements, and if it does, check out the second method (configuring a custom signup form).

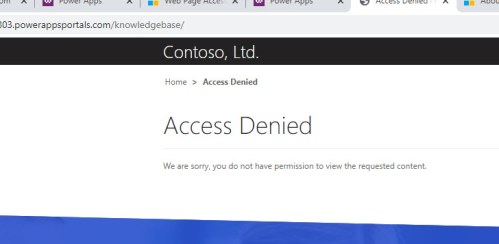
We’ll want to lock down any portions of the site that require email confirmation using Web Page Access Control Rules (link to MSDN documentation). The rules will be of type restrict read, which will prevent access to any pages covered by the rule, except for users in a Web Role related to the rule.

This means, of course, that you will be creating a new Web Role as well. You can call it something like “Confirmed Email Users”. This role will be given these restrict read rules (which will lock down the pages for everyone else).

You could for example, just have one or more members-only sections of the site, each with a parent page that you lock down with a Restrict Read Rule, or you could lock down the home page with a restrict read rule, so if anyone navigates to your site, they will immediately be taken to the sign in page.
Note however, that if you do this, you will then need to make sure that the default authenticated users role has access to the profile page, or new users won’t be able to go through the process. Remember that any more-specific rules will take priority over less specific ones, so if you put a restrict read rule on the homepage and relate it to your “Confirmed Email Users” role, you can override this by adding a restrict read rule to the profile page and assigning it to the default authenticated users role. That said, it’s probably best not to lock down the home page but to lock down the various pages in your portal providing the functions you want them to confirm their email for.
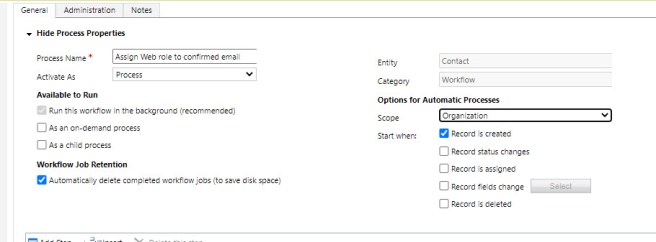
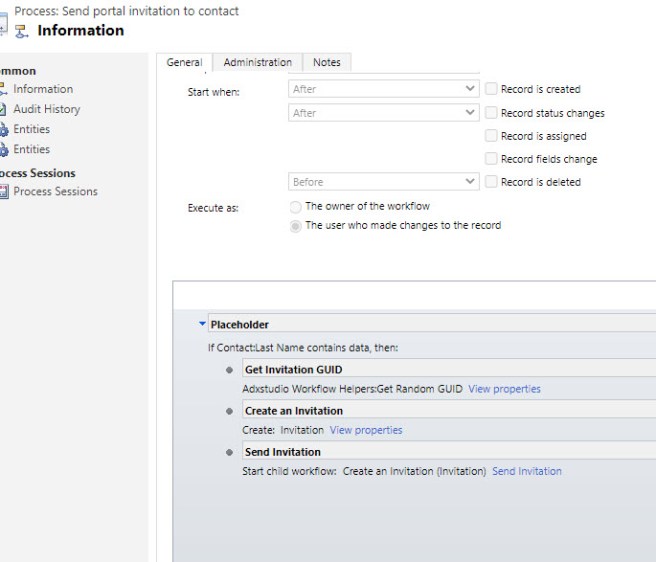
The missing part of the puzzle is of course how to assign the Web Role to newly registered portal users once and only once they have confirmed their email. To do this, you can create a traditional workflow to assign the web role to the user. This workflow will be triggered on update of any contact record’s “email confirmed” boolean value to true. This boolean value is set when the user confirms their email. When the Value changes, the workflow will fire and associate the Web Role to the contact.
First, create the workflow (remember that this is a classic background workflow, and you might need to use classic mode in order to create new workflows):
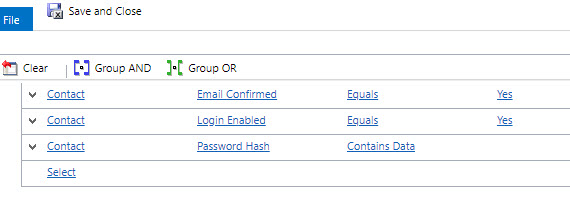
Set the condition:
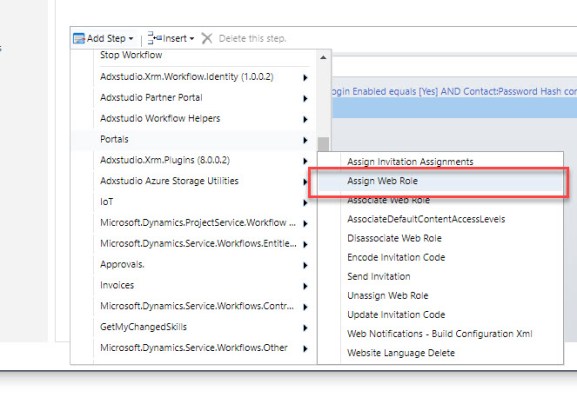
Assign the Web Role. For this you will be using an OOTB custom workflow activity step

Save and Activate the workflow. When users sign up, they will be taken to the profile and will see this message:

Clicking a link will send them an email which they can use to confirm their email, which will trigger the workflow and assign them the web role, granting access.
Using Custom Registration
One downside of the OOTB registration method I described above is that it allows people to authenticate, choose a username and password, and fill in their profile before ever confirming their email. A common sticking point for client is that they wish users to be able to do none of these things until they’ve confirmed their email. They want a registration form to be filled out, and once the form is submitted, the portal user will need to check their email for a confirmation email before they can fully authenticate to the Portal.
Fortunately, this scenario is easy to configure. A custom registration form will need to be used, which will trigger an email to be sent to the user. This email acts as an invitation to authenticate, and lucky for us there is an invitation model built-in to Portals that we can leverage for this purpose. We of course also want to turn off the default open signup mechanism – we only want users to register using our custom form. Once you’ve set it up, you can lock down the portal using the default authenticated users role and won’t need to create a special web role like you did with the first method – users can’t authenticate at all until they have confirmed their email via invitation.
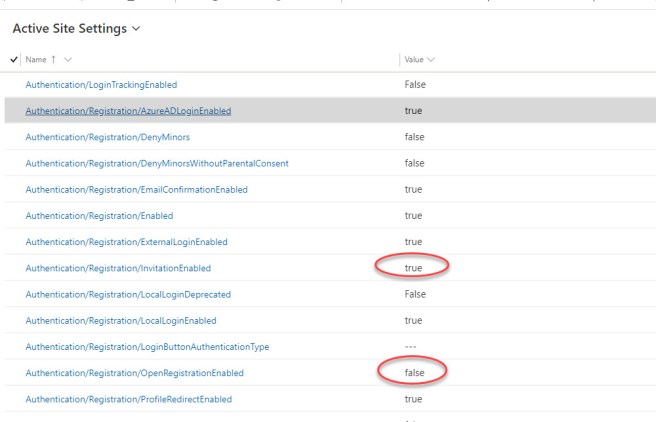
The first step is to configure Portal security to be invite-only. Observe the following Site Settings: (https://docs.microsoft.com/en-us/powerapps/maker/portals/configure/set-authentication-identity#enable-or-disable-user-registration).
Set “Authentication/Registration/OpenRegistrationEnabled” to false.
Set “Authentication/Registration/InvitationEnabled” to true.
This will have the effect of turning off the ability for portal Users to register using the OOTB registration – although you will build out a custom registration form to allow it. When they submit the form, they will receive an invitation email.
The next step is to create our registration form. We will need to create an entity form (https://docs.microsoft.com/en-us/powerapps/maker/portals/configure/entity-forms) with the following fields:
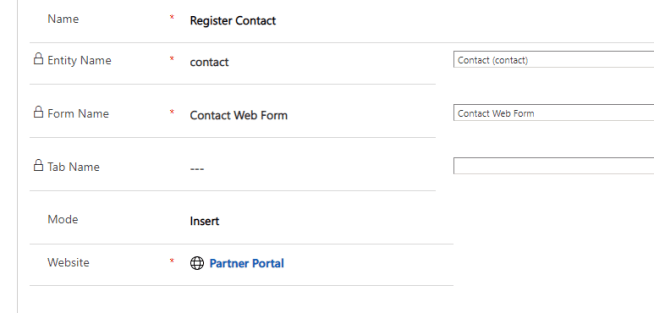
- Name: Anything you want, I suggest “Register Contact”
- Entity Name: contact
- Form Name: “Contact Web Form” if this form exists, can be used, or you can create a custom form for use with this entity form.
- Mode: Insert
- Website: Your Website
That’s it. Once you have created the Form, you’ll need to add it to a Web Page. I recommend creating a page called “Register” and adding the form to that page.
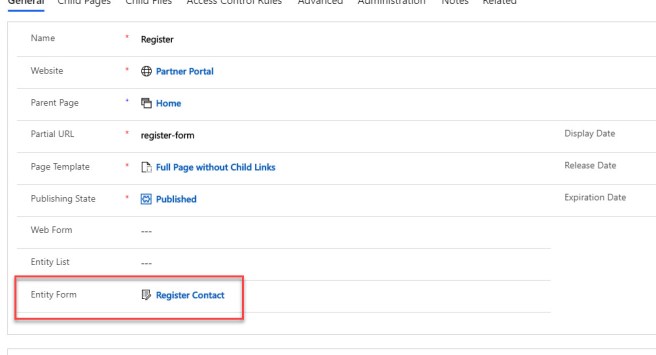
Add a link to this page to the header of your portal, so you can always click there as opposed to the sign in page. Make sure that when using custom registration that you don’t lock down the home page, because if you do, users will be sent straight to the OOTB sign in page, which can’t be customized.
Again, we need for an invitation to be sent upon submission of this form. To do this, we can again create a traditional workflow to send the invite to the user, and to set the value of the “confirmed email” boolean field on the contact record to true (so they won’t see the message prompting them to confirm their email in their profile).
The workflow will be triggered upon create of a contact record.

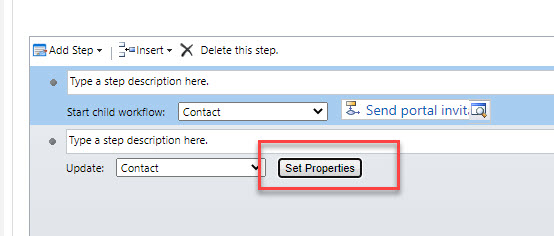
We can create a new workflow that uses a flag on the contact record to indicate that the contact was created on the Portal, so invitations won’t get sent to contacts automatically whenever a contact is created in the backend. We can of course manually send invitations still, so that resolves the case of needing to send an invite to a contact that was created manually. Alternatively, we can just call the OOTB Send portal invitation to Contact workflow which does everything we need.

This workflow is OOTB and will create the invitation and send it for you:
The only thing we really need to add to the parent workflow, therefore, other than the fact that it triggers on create of a contact (and we can optionally check a flag to ensure it comes from the portal – i haven’t done that in my screenshots) is we need to set the email confirmed flag to true. Since the process of signing up now essentially confirms their email, no need for them to do it a second time.
Once you activate the workflow, you should be good to go! Finally, a registration process that actually gives you what you would except in terms of UX, and fulfills the requirement to not allow activity on the portal until email is confirmed, to boot!
Hopefully this was useful to at least a few people out there. I’ve seen this come up so many times I’m surprised it’s not an OOTB option by now. I hope you enjoyed reading and expect more posts soon! Be sure to like and subscribe!

Hi Robert,
Thanks so much for your excellent article.
I started by looking at the first option, creating a web page access control rule with a related web role. The instructions were clear and easy to follow but unfortunately I couldn’t get the process to work, that is, adding the web role to the user once their email has been confirmed to give them access to the Knowledge Base page. The user received the email, and responded, the profile page showed the email address as confirmed but on the signing in again the user still didn’t have access to the Knowledge Base page.
It wasn’t until I added the web role manually that the user could access the Knowledge Base page.
Likewise with the second option. although I followed the instructions, creating a registration form, adding it to a new ‘Register’ web page, and linking to that page from the Portal header, the Register form was not displayed.
Is there anything you can suggest for these processes not working?
Many thanks
Steve
LikeLike
Hi Steve (and Robert),
Better late than never… but I faced the same issue as Steve describe. The user confirmed the email address, but for some reason the Web Role was not assigned to the user and thus, didn’t get access to the restricted pages.
I found two issues in the OOTB Registration method:
First, the flow didn’t trigger at all, due to the following statement: “The workflow will be triggered upon create of a contact record.” By using the OOTB Registration, the Contact is first created without the Email Confirmed set to true. Thus, the flow terminates quickly, as the conditions are not met. Instead, change the trigger “Start when” to “Record fields change” and Select the field “Email Confirmed” as the field to monitor. Changing this made the flow trigger when the user confirmed the email address by email.
Second, unfortunately the Web Role was not set even thought the flow was triggered when Email Confirmed was updated to true. I fixed this by using the “Associate Web Role” instead of the “Assign Web Role” workflow activity step.
Now, the workflow was working correctly. The flow is triggered, the Web Role is set and the user gets access to the restricted content.
I have not tried the second approach using a Custom Registration, but I would guess that at least the “Associate Web Role” part is also valid using this method.
Best regards
Jannik
LikeLike